The guide below will show you how to get any hard-drive-related issues solved via the built-in Check Disk utility in any Windows OS version. This feature is used for going through all the disks on your PC and finding problems. It is recommended that you perform such a check-up of your drives every once in a while.
How to use the Check Disk Feature properly
- Click on Computer.
- Right-click on the disk that needs to be checked.

- From there go to Properties.
- Choose the Tools tab and proceed with the “Check Now” button.
- When a small dialog window comes up, you will be able to select the exact actions that you want to be done during the drive check.
- Check both of the boxes to ensure a complete and proper process of going through the selected drive.
Please, remember that Windows is not capable of checking any disk that is currently in use.
What’s more, such a checking process will take some time (could even be hours). Be patient and prepared to wait.
In case you need to cancel a scheduled Disk Check:
Maybe you have scheduled a drive check, but you have changed your mind about performing it, so how do you fix this? In such a case, you can cancel it via applying a command. What you need to do for that purpose is to:
- Load an Administrator-Mode-Command Prompt by typing in cmd in the Start menu. After that proceed with right-clicking on the item that appears first in the results. From there select “Run as Administrator”. Enter the command here and change the drive letter if needed: chkntfs /x c:
The way to tell whether there is a manual Disk Check scheduled
- Again, enter an Admin-Mode-Command-Prompt window and write the command here: chkntfs c:
The way to check whether there is an automatic Disk Check scheduled
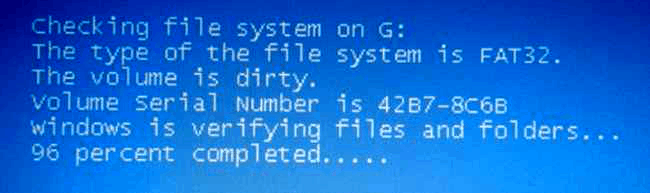
In case your PC has not been turned off properly, your OS could consider the drive in question “dirty”. This marking of the disk serves as a reminder about the possible file errors inside it. This means that a check-up of this drive is recommended.
To check that, you are supposed to use two different commands – the one above and the one below. The output will vary in case an automatic Disk Check is set to be performed.
The command: fsutil dirty query c:
How to use Check Disk from the Command Line
Once more, you will need an Admin-Mode-Command-Prompt dialog. Open it in the usual way, as mentioned above. After that, simply go with the following command to perform an exhaustive check of your disk: chkdsk /f /r C:
(Remember to change the drive letter with the one of the drive you need checked. Also, if the selected disk is being used, you will need to reschedule the check for the next start of your system.)
Please note that the command mentioned above is the best way to do a drive check. In case you want to perform a less exhaustive check, just delete /R option from the command.
We hope that this article and the guide above have been exactly what you need to fix your issues and get your problems solved. Please, share any thoughts and recommendations with us in the comment section. For your further enjoyment we have included the full list of geeky parametres below.
Leave a Reply