Spaces App for Mac

The presence of adware-based applications in the system is oftentimes a complete surprise for the users and is normally accompanied with the generation of a large number of advertisements (pop-ups, banners, ads, page-redirect messages, etc.) within the main browser. However, to your relief, these pieces of software are not as malicious as Ransomware, Trojans or the other computer viruses and are unlikely to cause serious damage to your system. Despite that, the adware representatives can be a source of unwanted browsing disturbances and that’s why, on this page, we will show you how to safely remove them. In fact, in this article, we will take a look at one specific adware application that’s called Spaces App, which has been reported to spam the users’ screens with various promotional materials by taking over popular browsers like Safari, Chrome and Firefox. If you are one of the people struggling to remove the ads generated by Spaces App, below, we will provide you with very detailed instructions with the help of which you can find and uninstall all files related to this application. We will also try to clear all doubts about whether this (or any other) adware can pose a real threat to your computer.
What is important to understand before you scroll down to the instructions is that you will not be able to remove the adware the same way you usually uninstall regular applications. This type of software has some specifics and you will need to carefully repeat the steps that are shown in the guide or use the suggested professional removal tool in order to safely and quickly deal with Spaces App. That’s why, you must make sure that you understand the instructions and carefully apply them because you will be interacting with important system files, the accidental removal of which may cause various system issues.
How dangerous is Spaces.app?
Applications like Spaces App (Search Mine, “Top Results app”), in general, are not considered to be the same as viruses and do not share the malicious capabilities of Rootkits, Ransomware or Trojan Horses. The sole purpose of their presence in the system is to advertise various kinds of goods, services, websites, etc. This is clearly beneficial for the manufacturers and distributors of the advertised goods and services as well as to the developers of the adware and other similar ad-generating and page-redirecting software. In fact, the former usually pay the latter for promoting their ads through applications like Spaces App by generating specific sponsored links and messages directly on the users’ screen during web browsing. The amount the developers of the adware can earn depends on how many users see these sponsored advertisements and how many times they click on them and for this reason they try to generate as many pay-per-click banners, pop-ups, hyperlinks, etc. as possible. The end users, however, may find it difficult to deal with so many aggressive advertisements during their regular web surfing and this is why they end up seeking a solution that can help them remove the nagging ads from the screen in a fast and effective manner.
SUMMARY:
| Name | Spaces App |
| Type | Adware |
| Danger Level | Medium (nowhere near threats like Ransomware, but still a security risk) |
| Symptoms | It is typical for adware to spam the screen of the main browser with ads and various sponsored commercial messages. |
| Distribution Method | Most commonly found inside different free program bundles, ads, free download links, torrents, shareware platforms and spam. |
[add_third_banner]
Spaces App Removal
Step 1: Closing Safari (or any other browser that you may be using at the moment)
First, you will need to close your browser if it is still open. If you can’t do that normally, you will need to Force Quit it:
Open the Apple Menu and select Force Quit to do that. You can also use the ⌘ key + Option Key combination to open the Force Quit Applications dialog box. In this box, select the Safari browser (or whatever browser you are using) and then click on the Quit button. Confirm the action by selecting Force Quit again.
Step 2: Killing suspicious processes
Open Finder and go to Applications > Utilities and then open Activity Monitor. Now take a careful look at the processes there – look for any that seem suspicious, unknown and questionable. If you think that a given process may be the culprit behind the issue or may at least be related to it, highlight it with the mouse and select the i option at its top.
In the box that opens, click on Sample.
Scan the sample files with the online scanner we have on this page and if any of them get flagged as malicious, delete them and then kill their processes.
Step 3: Safely launching the browser
Hold the Shift from your keyboard and then launch Safari – holding Shift will prevent any previously opened pages to load again, just in case any of them were related to the problem.
If any problematic pages still load after you safe-launch the browser, then do the following:
Force-Quit the browser (Safari) again and then turn off your Wi-Fi connection by clicking on the Wi-Fi off option from the Mac Menu. If you are using cable Internet, simply disconnect the cable from your Mac.
Step 4: Uninstalling suspicious extensions
After you safe-launch Safari and are sure none of the previously opened pages load now, go to Preferences > Extensions.
Select and uninstall (by clicking on the Uninstall button) all extensions there that are unfamiliar to you or that you think may be suspicious. If you are not sure about a certain extension, it’s better to uninstall it – no extension is required for the normal functioning of the browser.
Step 5: Cleaning Safari
If you have other browsers aside from Safari, do the following:
In Safari, open Preferences from the browser’s menu and go to Privacy.
Select Remove All Website Data and then Remove Now. Note that this will delete all stored site data including any saved passwords and usernames. In other words, you will have to manually log-in to every site where you have a registration so make sure you remember your usernames and passwords.
Back in Preferences, click on General and see what your Safari’s homepage is. If it has been changed without your permission, change it back to what it used to be or to whatever you like it to be now.
Now go to the History menu and select the Clear History option.
Do the same to all other browsers you may have in your computer – here are examples with Chrome and Firefox.
[add_forth_banner]
Cleaning Chrome
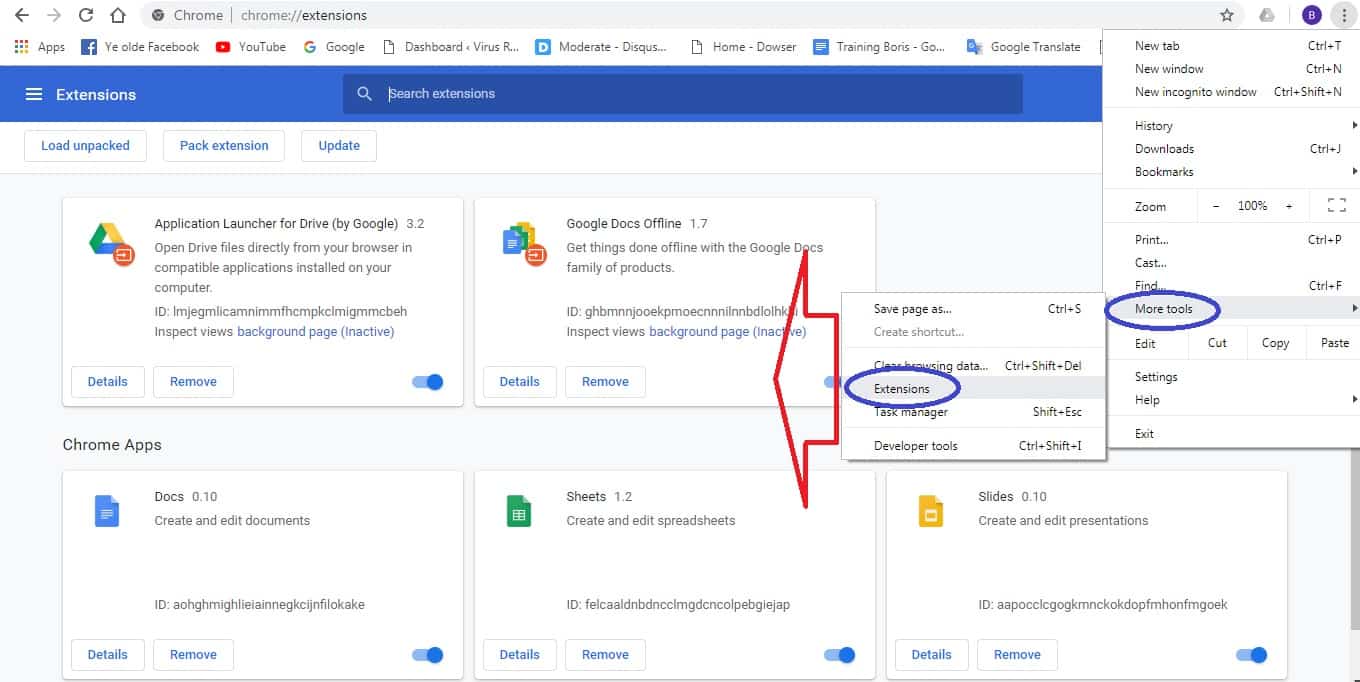
Open Chrome and open its main menu, then go to More Tools > Extensions. Click on the Remove button next to all of the extensions that you do not trust.
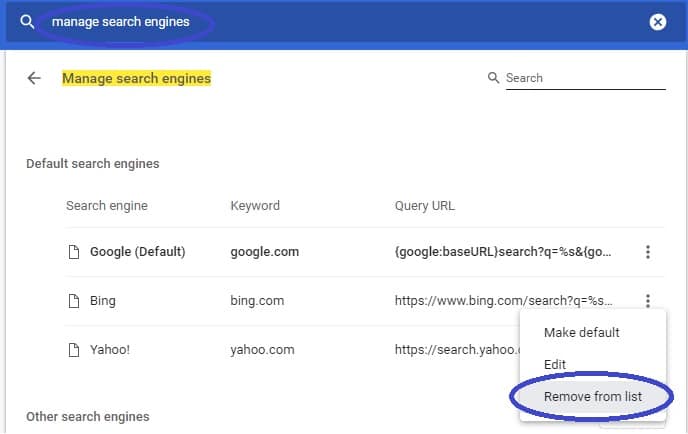
Next, from the main menu, go to Settings and type Manage Search Engines in the search bar. Open the result that shows up and then delete all search engines other than the one you normally use by clicking on the three-dot icon next to the other ones and selecting Remove from list.
Back in Settings, type Reset and clean up and open the option that shows up (Restore settings to their original defaults). Confirm by selecting Reset Settings.

Cleaning Firefox
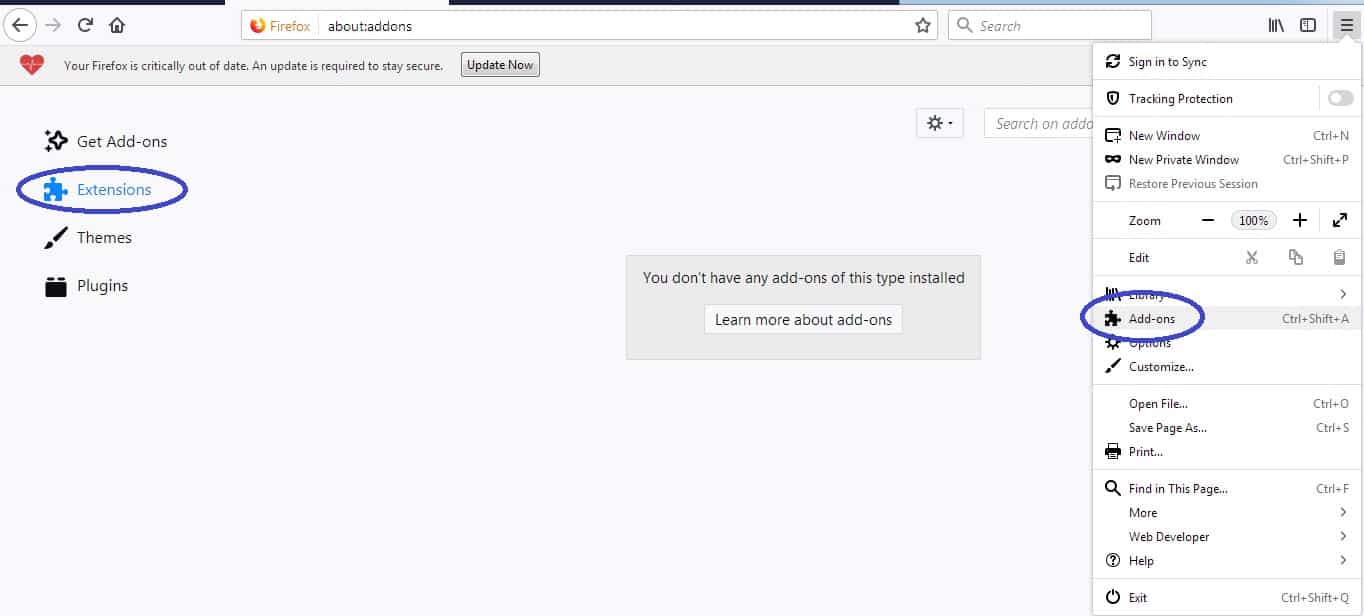
Open Firefox and then open its main menu. Go to Add-ons and open the Extensions menu from the left. Look at the extensions and Remove the ones you do not trust.
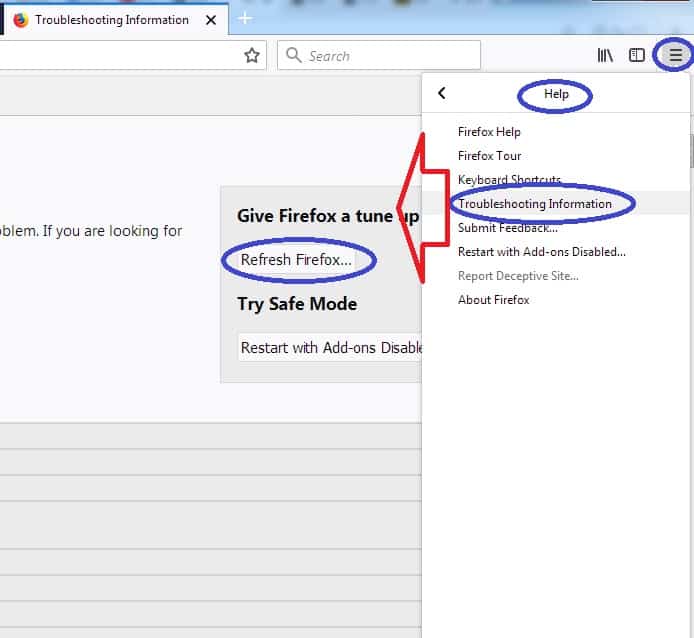
Next, open the menu again, go to Help > Troubleshooting information and in the page that opens, select Refresh Firefox and then confirm the action in the window that opens.
Leave a Reply