If the ads in your browser just won’t stop showing up each and every time you try to look something up on the Internet, go to your favourite site, send a work or college-related e-mail or do anything else using your browser, then something needs to get done about this in order to make the annoyance caused by the adverts go away. Normally, the most typical source of online ads are the sites that the users visit. However, if the commercial messages, the banners and the page-redirects that get shown during your browsing sessions are persistent and won’t leave you in peace even when you aren’t on a site that’s aggressive with its advertising policy, then you should consider the possibility of having a hijacker inside your browser (Firefox, Safari, Edge, Chrome, etc.). Typically, the homepage, the toolbar, the search engine service and/or some other aspect of your browser may have gotten altered, modified or outright replaced if there is indeed a hijacker inside the browser. These apps aren’t exactly difficult to spot – their presence in the computer is bound to become painfully obvious as their ads, pop-ups, page-redirects and browser changes are simply things you won’t be able to ignore, especially since you are likely going to be forced to experience them on a daily basis, each time you open the browser on your computer. There are some good news, though – the hijackers aren’t really malware threats that can harm your system like the nasty Trojan Horses or cryptoviruses that can lock your most valued personal data (which is something done by the Ransomware infections). Usually, the tricky thing about the browser hijacker app is their full removal. Oftentimes, it may not be all that easy to remove an app like that but if you follow the guide we will give you now, you should be able to easily eliminate a hijacker called Blogsfeed.info from your system – the browser hijacker that is probably the main reason you’ve found this article.
Be warned about the Blogsfeed.info ads
On really important security tip that, when applied, will make your system safer and less likely to get attacked by Ransomware or Spyware or other nasty viruses is to make sure that your browser doesn’t get too many ads spammed on it. Usually, avoiding sites that are overly aggressive with the commercial messages that they display and installing an ad-blocker tool in the browser should be enough. However, if you currently have Blogsfeed.info in the browser, it is important to remove it so as to avoid the potential exposure to unreliable advertising materials. Blogsfeed.info is not a software piece created with ill intention but may not always show you the most reliable advertising content. Naturally, this could lead to all kinds of security risks and even exposure to Ransomware, different viruses, Rootkits, Trojans and more. Therefore, keeping Blogsfeed.info inside your system is something that you are not advised to do. If you are interested in exploring the potential removal options you currently have, we should once again direct your attention to the guide on this page that we’ve written for our visitors.
SUMMARY:
| Name | Blogsfeed.info |
| Type | Browser Hijacker |
| Danger Level | Medium (nowhere near threats like Ransomware, but still a security risk) |
| Symptoms | Most of the symptoms are related to some form of browsing disturbance. |
| Distribution Method | The typical methods of distributing hijackers usually involve some form of software bundling. |
[add_third_banner]
Remove Blogsfeed.info
Blogsfeed.info Android Removal guide Blogsfeed.info Mac Removal guide. The following guide is only for windows users, it will help our readers get rid of the unpleasant Blogsfeed.info software. Follow the instructions and complete each step for best results. If you have any questions, feel free to ask them using our comment section down below. Preparation: Entering Safe Mode and Revealing Hidden Files and Folders Before you proceed with the actual removal instructions, you will need to take two extra steps in order to ensure that the guide has maximum effect. For best results, we advise our readers to boot into Safe Mode prior to attempting to remove Blogsfeed.info. If you do not know how to do that, here is a separate How to Enter Safe Mode guide. Also, in order to be able to see any potentially undesirable files, you should reveal any hidden files and folders on your PC – here is how to do that.
Removing Blogsfeed.info From Windows
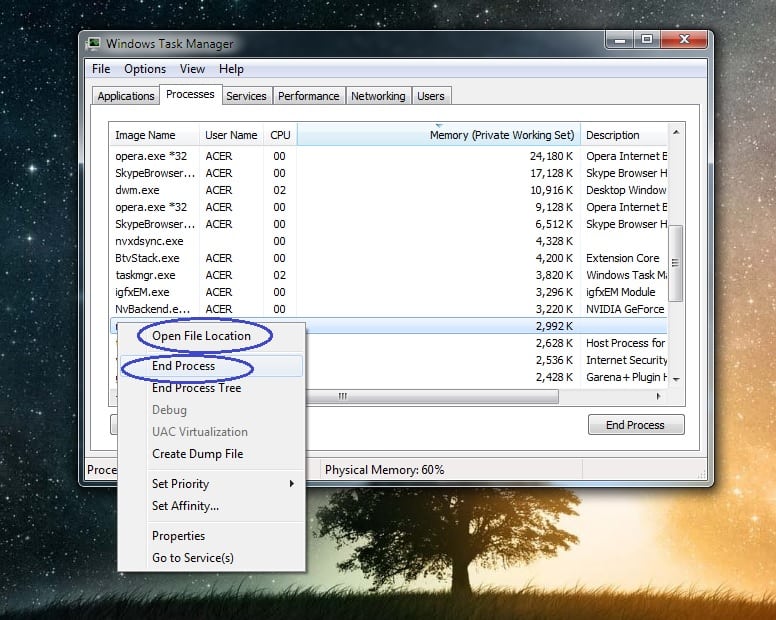
Step 1: Checking the Task Manager Before we start deleting files related to Blogsfeed.info we want to make sure that all services related to the viruses are killed before we proceed. Open your Task Manager by using the Ctrl + Shift + Esc keys and go to the Processes tab. Look for any suspicious processes. For example, any unfamiliar process that uses high amounts of RAM and/or CPU. If you aren’t sure if a certain process comes from malware, tell us in the comments. Right-click on any process that you consider shady and select Open File Location. Delete anything from the file location of the process.
Step 2: Disabling Startup programs Use the Winkey + R keyboard combination to open the Run search bar and type msconfig. Hit Enter and in the newly opened window, go to the Startup tab. There, look for suspicious entries with unknown manufacturer or ones that have the name Blogsfeed.info on them. Right-click on those, and select disable.

Step 3: Uninstalling unwanted programs Go to Start Menu > Control Panel > Uninstall a Program. Click on Installed On to sort the entries by date from most recent to oldest and look through the programs that come at the top of the list. Right-click on any entries that appear shady and unwanted and then select Uninstall to remove them from your PC. If you see the name Blogsfeed.info in the list of programs, be sure to remove the software without hesitation.
Step 4: Checking for shady IP’s Open your Start Menu and copy-paste notepad %windir%/system32/Drivers/etc/hosts in the search bar. In the notepad file, look below Localhost and see if there are any IP addresses there. If there are some, send them to us in the comments and we will tell you if you should take any action. [add_forth_banner] Step 5: Cleaning-up the browsers You will also have to uninstall any undesirable browser extensions from your browser programs. Here’s how to do that for some of the more popular browsers:
Getting rid of Blogsfeed.info from Chrome
Open Chrome and open its main menu. Go to More Tools > Extensions. Look through the list of extensions and uninstall any that you think could be suspicious. To remove them – click on the trash can icon next to each extension. You can also use a specialized Chrome CleanUp tool if you cannot manually remove a certain extension. Here is an article where you can learn more about the CleanUp tool.
Removing Blogsfeed.info From Firefox
Open Firefox and go to its Menu. Select the Add-ons button.From the left panel, select Extensions and take a look at the different entries. Remove any of the that might be unwanted.
Removing Blogsfeed.info From Windows Internet Explorer
Once you open your IE browser, click on the Tools button at the top-right corner of the program and from the drop-down menu select Manage Add-ons. Check each one of the four different groups of add-ons and search for anything that seems undesirable. If you find anything, click on it and them select Remove.
Removing Blogsfeed.info From Windows Edge
Open the main menu of Microsoft Edge and go to Extensions. Find the extensions that you believe could be unwanted and right-click on them. Then, select Uninstall. Step 6: Checking the Registry Editor Open the Run search bar again and type regedit in it. Hit Enter and once the Registry Editor opens press Ctrl + F. In the search field type Blogsfeed.info and click on Find Next. Tell us in the comments if any results came up when you searched for Blogsfeed.info in your PC’s Registry.
Step 7: Deleting recent entries For this step, you will have to open your Start Menu and copy-paste the following lines, one by one:
- %AppData%
- %LocalAppData%
- %ProgramData%
- %WinDir%
- %Temp%
Hit Enter after each one to open a file directory. In the directories, delete the most recent entries that you find there. In the Temp folder, delete all files.
Step 8: System Restore In order to be fully sure that the unwanted software has been removed from your machine, you can also try using a Restore Point to roll back your system its last stable configuration. However, in order to do that, you would have to previously had had a restore point created. On most systems, such points get created automatically but this isn’t always the case.
- If you want to learn how to configure System Restore and how to manually create Restore Points, follow this link.
- Open your Start Menu and type System Restore.
- Click on the first result – a setup wizard should open.
- Read the brief description of the process and select Next.
- Now, choose a restore from the presented list. You can also check the Show more restore points option in order to reveal any other restore points that might be saved on your PC.
- Click on Scan for affected programs to see what programs will get deleted or restored after you use the Restore Point. (optional)
- Click on next and take and then select Finish.
- A warning window will appear telling you that once the process starts, it shouldn’t be interrupted. Select Yes and be patient as this might take some time. Do not do anything on your PC throughout the duration of the process.
Step 9: Windows Refresh/Reset Use this method only if nothing else has worked so far as it is a last resort option. If you do not know how to do it, this separate guide will give you the information that you need.
Leave a Reply