The information below has been carefully chosen and gathered to help users who have experienced the “You are missing one or more network on this computer” error find a solution to this problem. The Guides attached below are compatible with all Windows versions.
This kind of error occurs because of some Windows Sockets registry entries, required for network connectivity. Sometimes some of the entries are “missing” and that causes the aforementioned error. The problem gets reported by Windows Network Diagnostics. Usually such an error occurs when your PC is unable to connect to the internet and you decide to run a Diagnose Check. Maybe you will be capable of pinging your destination address, however, your browser will be incapable of doing the same. Most commonly, some kind of inconsistency in Windows Sockets API also known as Winsock is the reason for this issue. This socket is the component, responsible for both the incoming and the outgoing network requests of the programs. Such a problem might also occur because of your Internet Provider. Nevertheless, in case the Internet works well on of any of your other devices connected to the same ISP, it means that the ISP is FULLY FUNCTIONAL. After concluding this, we can go on with the troubleshooting options.
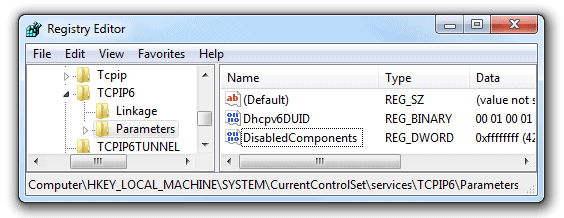
Solution #1: Stop IPv6
Firstly, you have to click on the Start Button. Secondly, you have to enter regedit and push the Enter key. After that, review SYSTEM, CurrentControlSet, HKEY_LOCAL_MACHINE, TCPIP6, services, and Parameters. Then just right-click on Parameters and choose New. Then select DWORD (32-bit) Value. Give a new name to the value – DisabledComponents, and then press Enter. Then again right-click on the newly-set DisabledComponents value and hit Modify. Change the value of DisabledComponents to FFFFFFFF. Press OK. IPv6 should be completely disabled after the system performs a restart.
Solution #2: Restart Winsock
If your Winsock is corrupted, it is likely to cause such errors. Normally, the problem could be solved by rebooting winsock. In order to do that, stick to the instructions below.
Hit the Windows key. Enter cmd in the search box. You will see a list of results displayed, simply choose cmd and select Run as Administrator. If your OS is Windows 8 or 10, press the Windows Key, hold it and press X. Select Command Prompt (Admin).

A black command prompt window will appear. There, write “netsh winsock reset“. After that press Enter.
Reboot your PC and check whether your problem has been solved.
Solution #3: Reboot Your Network Adapters
An occasional bug in network adapters might stop it from picking up the necessary protocols. Sometimes all you need to do is to perform a simple restart of the adapters. Do that by holding the Windows Key and pressing R. You will see a dialog – enter ncpa.cpl there. After that select OK.
There will be a list of network adapters. In case you are not sure which one exactly is the one you need, implement the instructions below for all of the listed adapters.
Just right-click on the chosen Network Adapter, and press Disable. After that right-click on it once more and select Enable.
Solution #4: Restart Components
This potential option involves resetting and refreshing components participating in network connectivity.
Create a text file and paste the following code in it, after which save it as fixnetwork.bat
ipconfig /flushdns
ipconfig /registerdns
ipconfig /release
ipconfig /renew
NETSH winsock reset catalog
NETSH int ipv4 reset reset.log
NETSH int ipv6 reset reset.log
pause
Exit
What you need to do is to right–click on the newly-created bat file and select Run as Administrator. Be careful with the “access denied“ messages. In case you see any, simply go on with the following instructions below. Press any key when you are asked to restart the system. Then, simply TEST it.
Attention! It is recommended to back-up your registry before doing anything that involves it. To do that you need to click on File ->Export (with Computer) chosen from the top-left pane; and export it (saving it somewhere on your PC). It is necessary to implement these steps whenever altering the registry.
In order to customize permissions, simply change the registry key below:
Do that by pressing and holding the Windows key and pushing R at the same time. Enter regedit in the dialog box. Then select Enter. In this way you will open the Registry editor window.
Press and hold the CTRL and F keys. In the generated Find What box, enter the value below and select Find Next.
Wait while it is looking for the key. Once it is done, expand this key to search for the folder named 26
*** eb004a00-9b1a-11d4-9123¬-0050047759bc
The full path to the key is:
*** HKEY_LOCAL_MACHINE/SYSTEM/CurrentControl-Set/Control/Nsi/{eb004a00-9b1a-11d4-9123¬-0050047759bc}/26.
Then select 26 and hit Permissions.
Press the Add button, enter everyone in the text box. Then select OK. If everyone has already been typed, then authorize Full Access. Hit OK and open the downloaded file with Administrator’s rights.
Solution #5: Install TCP/IP again
Important: this particular method is not applicable for home–based versions of Windows.
TCP/IP represent the protocols that determine the way you connect to the Internet. In case there is any discrepancy in them, your internet access could be blocked immediately. Press and hold the Windows Key and then hit the R key. Enter ncpa.cpl there and hit OK.
There could either be a wireless or a wired connection.Whatever your case is, right-click on the active connection, and select Properties.
Hit the Install option under This Component Uses the Following Items. Select Protocol, and after that hit the Add button.
Press the Have Disk button. Enter C:\windows\inf and select OK under Copy Manufacturer’s files from the box.
Select Internet Protocol (TCP/IP) under the Network Protocol list. Hit OK after that.
In case you receive the “This program is blocked by group policy“ error, then there might be one other registry entry to add. Once added, it will allow this install. Hold the Windows key and press the R key.
Enter regedit. Then push Enter.
When the Registry Windows appears, go to
HKEY_LOCAL_MACHINE\SOFTWARE\Policies\Microsoft\Windows\safer\codeidentifiers\0\Paths
Once there, right-click on paths in the left pane. Then hit Delete. At that point you are ready to begin the process above once again to reinstall TCP/IP.
Terminate all the running processes and reboot your PC. You should have solved your issue by following the instructions above. In case your issue has remained unresolved, proceed to the next potential solution.
Solution #6: Uninstall Your Anti-Malware Tool and Install it Again
In case you have recently integrated a new piece of Internet Security Software, it could be preventing you from accessing the Internet. Simply disable it for a short time to see whether this is the cause of your issue. The easiest and least time-consuming way is to uninstall it, then restart your computer and test your system. If your issue has disappeared, install another anti-virus program. Click on the Windows key and the R key at the same time. In the dialog that has appeared write appwiz.cpl. Then select OK. You will see a programs list. Look for your security software inside it and right–click on it. Choose Uninstall. Stick to the instructions that come to remove it from your system. Then reboot your machine.
Solution #7: Powerline Adapters
In case you are using a Powerline Adapter, it could be interfering with your network. If you reset it, that might solve most of the issues that could appear along with it. Use the instructions manual of the adapter to restart your Powerline Adapter.
Solution #8: Stop Proxy
Open Settings -> go to Network -> open Proxy -> choose Manual Proxy Settings and turn the proxy off.
Solution #9: Modify the Wireless Mode of your internet router’s to 802.11g
Some users have managed to fix this error by changing their wireless router’s Wireless Mode from 802.11b+g+n to 802.11g. Typically, nearly all wireless routers are in the 802.11b+g+nWireless Mode out of the box. For the purpose of altering your internet router’s Wireless Mode to 802.11g, you have to:
Access your wireless router’s administration and settings panel via a browser of your own choice. Instructions for logging in your wireless router’s administration and settings panel are usually available on the user manual that comes with your wireless router. Review everything under the Wireless category. Look for a setting called Wireless Mode or Mode. Modify your wireless router’s Mode/Wireless Mode to 11g or 11g – whichever is applicable in your case. Save the changes you have made and exit the administration and settings panel of your Wireless Router. Reboot both your router and your device. Once your PC gets restarted, check whether the error has disappeared.
Solution #10: Maybe performing a hard-reset of your wireless router will help
Provided that the options above are not helpful in your case, there is one more thing you can try. What you need to do is to implement a hard-reset of the router you use. What a hard reset of your router normally does is recover all of its default settings and preferences. In 90% of the recorded case, by doing that, you will be able to fix your problem and regain your Internet access. If you want to perform such a reset, you have to:
Take a paperclip or a pin (or any other pointy object).
Find the recessed Reset button of the router. Normally, this button represents a small hole. Usually it is located at the back of your router with the word Reset put above or below it. Insert the pointy end of whatever you are using into the Reset button. Push it all the way in and hold it inside for some time. This should complete a reset of your router successfully.
Leave a Reply