We introduce the possible means of solving the ‘Windows was unable to complete the format’ error, as well as some useful information about the reasons why such an issue might occur. We hope that the steps below will be exactly what you need to get this problem fixed and avoid throwing your USB Drive away.

Symptoms and possible origins of the ‘Windows was unable to complete the format’ issue
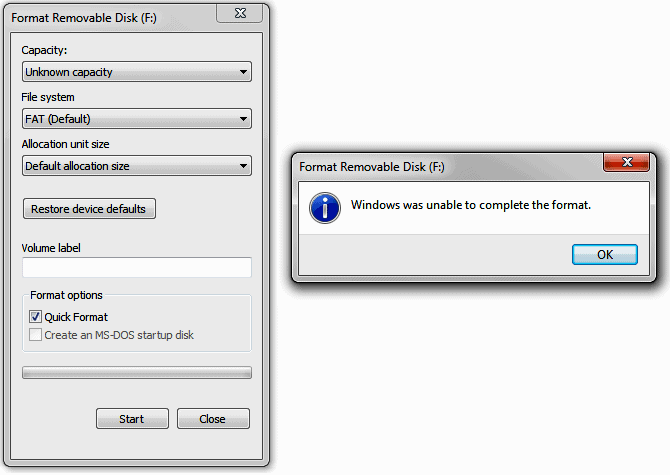
The ‘Windows was unable to complete the format’ warning might appear when your USB Drive turns out to be inaccessible for a certain period of time. As a result, it cannot be properly and fully formatted. In fact, such problems are becoming more and more common as USB drives and memory cards have become very popular means of storing data. However, sometimes they need to be completely formatted and at that point you may have become a victim of such an issue. The potential reasons for that are listed below.
- Malware contamination. You can easily move data from a device to another one both via a USB drive or a memory card. That’s why it is very likely that they could get infected with an unpleasant malware type. Consequently, the virus makes them stop working and you cannot format them.
- The affected storage device might be physically damaged. Some of the storage device’s components that you are using might have faced some kind of physical damage. As a result, your computer might refuse to format the damaged device. In such a case it is always cheaper and better to buy a new device.
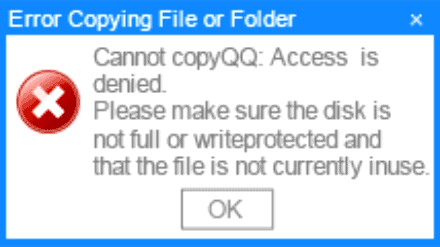
- The affected device is write-protected. Never will you be able to format any drive or disk that has been write-protected. Formatting is a version of a writing activity, so performing it will be impossible. Remove the protection if possible and then try again. Maybe this will be the solution to your problem.

Ways to get “Windows couldn’t complete format” on a USB drive solved
In case you cannot format your USB drive in the usual way, we suggest that you try the brief guides below to get your issue fixed quickly and successfully.
First of all, connect your drive to your computer and try the following steps:
Method №1 : Use Disk Management to format your drive
In fact, Disk Management is a tool developed by Windows. What it does is manage the disks and drives on every Windows PC. You can delete partitions, create new ones, extend them, shrink them, change the letters of the drives, etc., by using this utility. Sometimes you can even format damaged flash drives.
#1
- Load Disk Management.
- Then right-click on the My Computer icon. Proceed with “Manage“’;
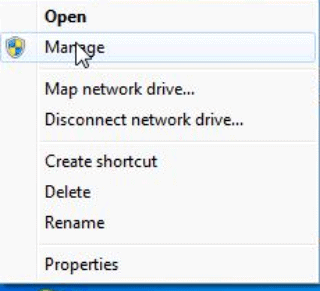
- After that select Disk Management from the left side.

#2
- The next thing to do is to right-click on your drive and then choose “Format” and simply perform a quick formatting. If this step is not applicable in your case, proceed with the next one.
#3
- Then you should right-click on the drive.
- From the displayed features, “New Simple Volume“. From there simply follow the onscreen instructions.
Method № 2: Try formatting your drive through Command Prompt
Maybe you will have to switch to Command Prompt and try to get the problem solved from there in case the methods that have been explained so far don’t work in your case.
# 1
Hit the Start button. Then type cmd in the search box. Follow that by pushing Enter.
# 2
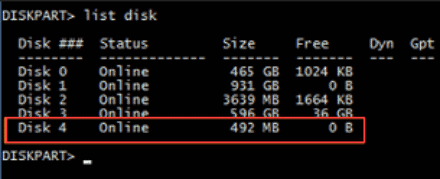
When the Command Prompt is loaded, enter diskpart. Follow that with pressing Enter. After that the disk list of the particular computer will be visible. Usually Disk 4 is the one in question.

#3
Enter Disk 4. Press Enter. Then your disk will be completely scanned and the file structure that is damaged will be erased during the process of scanning. In the end you will get a notification letting you know about the fact that your drive has been cleaned.
# 4
- Enter “create primary partition”.
- Proceed by hitting Enter.
- After that continue with typing Command prompt format /FS:FAT32J:
- Push Enter. In this case J will be the letter of the disk.
Hopefully, the information above has been useful. Share all the issues that might appear in the process of following the instructions so that we can help you further.