Faced with a browser hijacker name Virus Alert from Microsoft “This Computer is Blocked” that is not allowing to use your browser in peace? If that is the issue you are currently struggling with, we’ve got you covered. Having issues with a browser hijacker such as Virus Alert from Microsoft “This Computer is Blocked” is nothing unusual and is actually a really common problem that a lot of computer and smartphone users have experienced and are experiencing. The key to dealing with successfully and with ease is knowing what you are up against and what the most effective counteraction is.
In the case of Virus Alert from Microsoft “This Computer is Blocked”, the first thing you should know is that it isn’t a nasty virus like Ransomware or Trojans or other similar insidious cybercrime tools. Sure, a hijacker can “invade” invade your Chrome or Safari or Firefox browser, replace the search engine and the homepage and spam it with page redirects, ads, pop-ups, banners and advertising links but it will probably not initiate any processes that can harm your system or carry out some other malicious activity. However, despite this, it is understandable if you still want to get rid of Virus Alert from Microsoft “This Computer is Blocked” – after all, it can be really annoying and irritating to have on your computer while providing you with little to no real functionality that you can benefit from.
Virus Alert from Microsoft “This Computer is Blocked” Removal Guide
Android user, please use our Android Malware Removal guide.
Mac user, please use our Mac Malware Removal guide.
The following guide will help our readers get rid of the unpleasant Virus Alert from Microsoft “This Computer is Blocked” software. Follow the instructions and complete each step for best results. If you have any questions, feel free to ask them using our comment section down below.
Preparation: Entering Safe Mode and Revealing Hidden Files and Folders
Before you proceed with the actual removal instructions, you will need to take two extra steps in order to ensure that the guide has maximum effect.
For best results, we advise our readers to boot into Safe Mode prior to attempting to remove the virus. If you do not know how to do that, here is a separate How to Enter Safe Mode guide.
Also, in order to be able to see any potentially undesirable files, you should reveal any hidden files and folders on your PC – here is how to do that.
Removing Virus Alert from Microsoft “This Computer is Blocked”
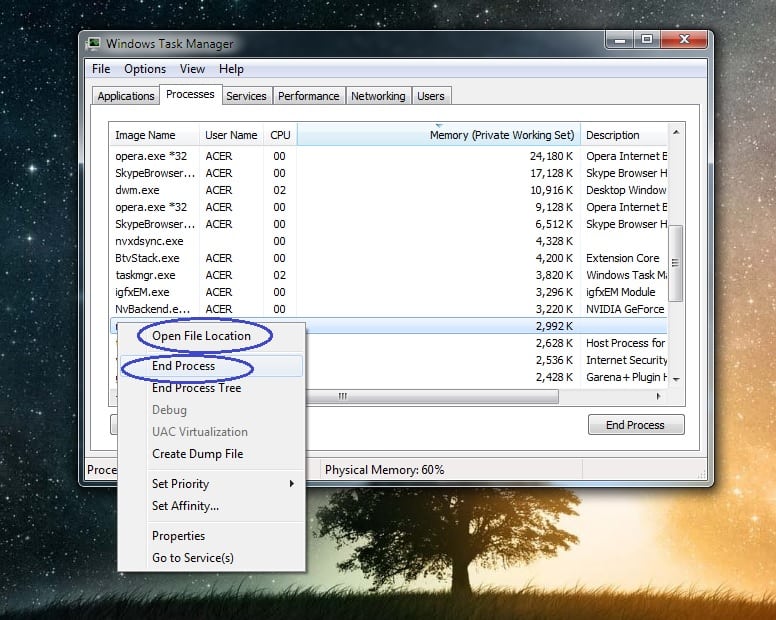
Step 1: Checking the Task Manager
Open your Task Manager by using the Ctrl + Shift + Esc keys and go to the Processes tab. Look for any suspicious processes. For example, any unfamiliar process that uses high amounts of RAM and/or CPU. If you aren’t sure if a certain process comes from malware, tell us in the comments.
Right-click on any process that you consider shady and select Open File Location. Delete anything from the file location of the process.

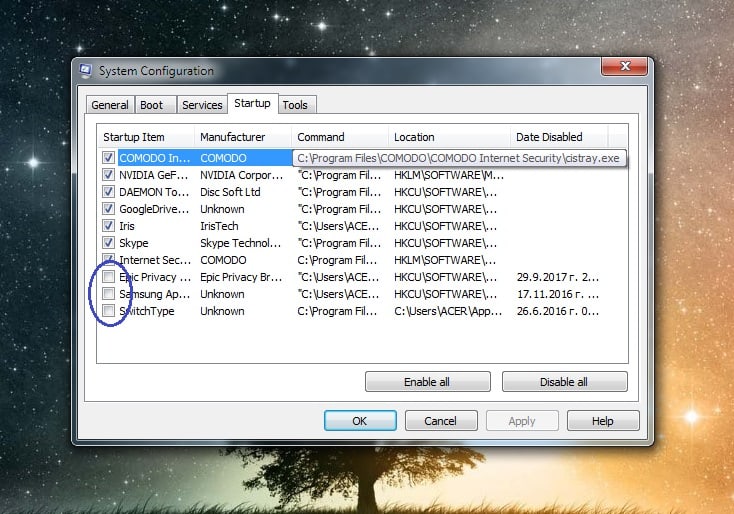
Step 2: Disabling Startup programs
Use the Winkey + R keyboard combination to open the Run search bar and type msconfig. Hit Enter and in the newly opened window, go to the Startup tab. There, look for suspicious entries with unknown manufacturer or ones that have the name Virus Alert from Microsoft “This Computer is Blocked” on them. Right-click on those, and select disable.

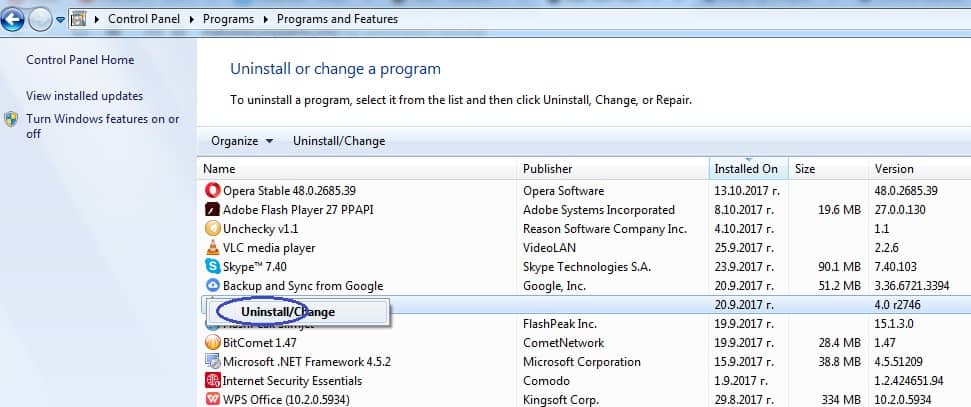
Step 3: Uninstalling unwanted programs
Go to Start Menu > Control Panel > Uninstall a Program. Click on Installed On to sort the entries by date from most recent to oldest and look through the programs that come at the top of the list. Right-click on any entries that appear shady and unwanted and then select Uninstall to remove them from your PC. If you see the name Virus Alert from Microsoft “This Computer is Blocked” in the list of programs, be sure to remove the software without hesitation.

Step 4: Checking for shady IP’s
Open your Start Menu and copy-paste notepad %windir%/system32/Drivers/etc/hosts in the search bar. In the notepad file, look below Localhost and see if there are any IP addresses there. If there are some, send them to us in the comments and we will tell you if you should take any action.
[add_forth_banner]
Step 5: Cleaning-up the browsers
You will also have to uninstall any undesirable browser extensions from your browser programs. Here’s how to do that for some of the more popular browsers:
Chrome
Open Chrome and open its main menu. Go to More Tools > Extensions. Look through the list of extensions and uninstall any that you think could be suspicious. To remove them – click on the trash can icon next to each extension.
You can also use a specialized Chrome CleanUp tool if you cannot manually remove a certain extension. Here is an article where you can learn more about the CleanUp tool.
Firefox
Open Firefox and go to its Menu. Select the Add-ons button.From the left panel, select Extensions and take a look at the different entries. Remove any of the that might be unwanted.
IE
Once you open your IE browser, click on the Tools button at the top-right corner of the program and from the drop-down menu select Manage Add-ons. Check each one of the four different groups of add-ons and search for anything that seems undesirable. If you find anything, click on it and them select Remove.
Edge
Open the main menu of Microsoft Edge and go to Extensions. Find the extensions that you believe could be unwanted and right-click on them. Then, select Uninstall.
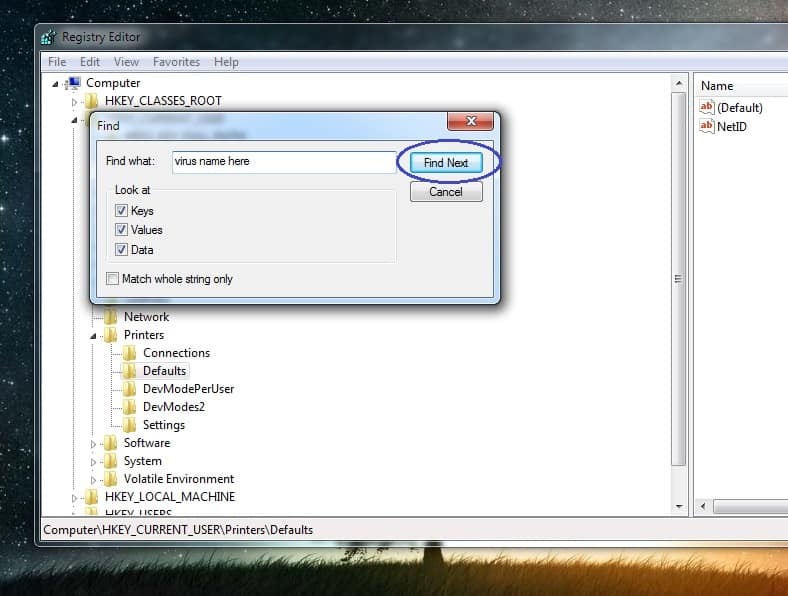
Step 6: Checking the Registry Editor
Open the Run search bar again and type regedit in it. Hit Enter and once the Registry Editor opens press Ctrl + F. In the search field type Virus Alert from Microsoft “This Computer is Blocked” and click on Find Next. Tell us in the comments if any results came up when you searched for Virus Alert from Microsoft “This Computer is Blocked” in your PC’s Registry.

Step 7: Deleting recent entries
For this step, you will have to open your Start Menu and copy-paste the following lines, one by one:
- %AppData%
- %LocalAppData%
- %ProgramData%
- %WinDir%
- %Temp%
Hit Enter after each one to open a file directory. In the directories, delete the most recent entries that you find there. In the Temp folder, delete all files.


Step 8: System Restore
In order to be fully sure that the unwanted software has been removed from your machine, you can also try using a Restore Point to roll back your system its last stable configuration. However, in order to do that, you would have to previously had had a restore point created. On most systems, such points get created automatically but this isn’t always the case.
- If you want to learn how to configure System Restore and how to manually create Restore Points, follow this link.
- Open your Start Menu and type System Restore.
- Click on the first result – a setup wizard should open.
- Read the brief description of the process and select Next.
- Now, choose a restore from the presented list. You can also check the Show more restore points option in order to reveal any other restore points that might be saved on your PC.
- Click on Scan for affected programs to see what programs will get deleted or restored after you use the Restore Point. (optional)
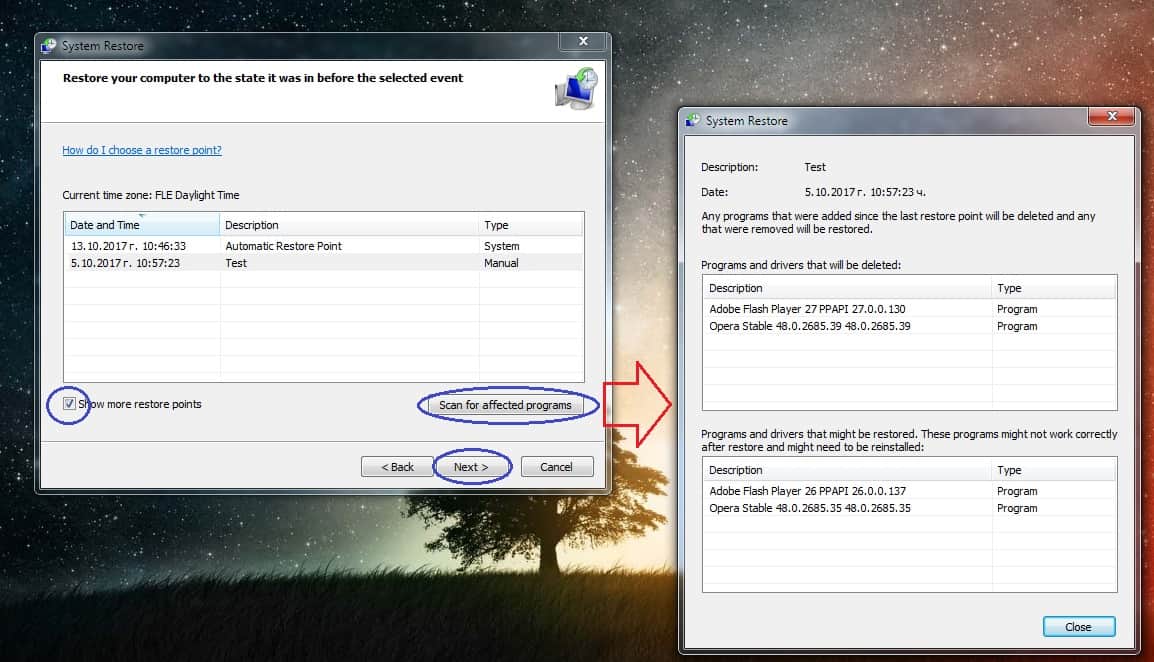
- Click on next and take and then select Finish.
- A warning window will appear telling you that once the process starts, it shouldn’t be interrupted. Select Yes and be patient as this might take some time. Do not do anything on your PC throughout the duration of the process.

Step 9: Windows Refresh/Reset
Use this method only if nothing else has worked so far as it is a last resort option. If you do not know how to do it, this separate guide will give you the information that you need.
Removing a hijacker, however, might prove to be a tricky task if you don’t know what you are doing. Such apps tend to lack any built-in removal options like most programs you are likely used to working with and it’s even possible that if you don’t completely remove all Virus Alert from Microsoft “This Computer is Blocked”-related date from your computer the intrusive app might return to nag you. That said, we have some good news for you – our specially designed removal guide for this unpleasant piece of software that we’ve posted below is here to help you take care of the pesky annoyance and clean your browser from it.
In case you are having any difficulties with the manual instructions in our guide, know that you can always tell us about them in the comments section at the bottom of this post and we will try to help you with whatever we can. Also, note that the recommended tool in the guide is also a great option for removing the unpleasant hijacker – it will automatically scan your computer for any unwanted data and help you eliminate it with ease.
Hazards related to browser hijackers
Though you aren’t dealing with a Ransomware infection, a Trojan Horse virus or a Spyware program that can cause all kinds of serious issues to both your PC and your virtual privacy, underestimating the potential hazards that may come from a hijacker is inadvisable. Though such apps are typically not malicious, their adverts, page-redirects and other promotional materials are better left or else, before you know it, you may land on some sketchy webpage with unreliable contents. This is also why removing Virus Alert from Microsoft “This Computer is Blocked” and ensuring that you stay safe on the Internet and only visit reliable sites is so important if you wish to ensure that your computer doesn’t get targeted by any malicious cyber threats.